
The Capture of Captain Stass
A story-based, narrative scenario for FL1 and perhaps low end FL2 points that links in with the launch of special Nexus/2nd birthday figure, the Hükk Bounty Hunter, and presents an event from the accompanying story: The Hükk Hunts.
This is a deliberately complex and absorbing, mission-based, ambush scenario using the Hükk. As with any narrative scenario, it can be made unbalanced, so we recommend playing it several times, changing over the roles of Prey and Hunters each time. Do read through the Designer’s Notes before starting the game!
Freeborn trader Captain Ban Stass is trading with the Ghar Empire. Using elaborate methods to hide his identity, he tricks the Ghar into believing he is of a non-human species. The goods he receives from them go to disreputable dealers and collectors, all of whom cherish Ghar goods in mint-condition – even if they do retain the stench of their origin!
Ban Stass’ trading partner is now the deadly Ghar Rebel faction, a more direct threat to the Algoryn Protectorate than even the Ghar Empire. He provides Fartok’s lieutenants with Ghar manufactured parts in return for favours and first pickings from the ships the Rebels capture – after all, the Ghar cannot find use for much of what humans might think of as luxury items.
The most recent assault involved the destruction of a Protectorate liner carrying several politicians from the powerful Optimate legers, including the Rahq. Analysis of the remains showed many of the parts on the slain Ghar were almost brand-new, sourced directly from the Empire.
SD Intelligence has investigated and implicated Captain Stass: he has gone too far. A Hükk has been hired by the Algoryn to capture him and has been given access to an AI formation’s troops for support. The Hükk has determined the best place for an ambush, the surface of the planet where Stass secretly exchanges his goods with the Rebels.
This despicable dreg of a vardosi will be caught!
Scenario Data
Type: Narrative, Objective; Equal forces, FL1 recommended.
Running the Game
The two forces are designated the Hunters (the attackers) and the Prey (the defenders). Both should be roughly equal points between 35 and 85 points but the Prey must have an infantry command squad. The Prey also start the game in control of a towed suspensor platform or wheeled hauler on top of which is a cargo pod.
The table is 6’x4’ but played lengthwise with an off-centre deployment. The Prey aim to get their commander (the Target) and the cargo pod (the Cargo) off either of the short table edges; the Hunters hope to capture the Target, else kill the Target and capture the pod.
The Hunters have some special options and restrictions for the game and, in addition, can capture the Target. There should be two, numbered, dummy markers for each Hunter unit that is equipped with a camo-drone.
Neither side can take vehicles of over a 50mm base (no transports) and can take only a single mounted squad or light vehicle such as Striker or Avenger (though see Designer’s notes). The Prey must have an tactical level, infantry command squad, the commander of which is the Target. Both sides should, ideally, have plenty of infantry.
Suitable forces from the fiction might resemble the following:
The Prey: Captain Stass is defended by some Freeborn vardanari and domari plus some irregulars in the form of unsoma-d ferals. He also has some Outcasts who wish to defect to the Rebel cause. As the Ghar have none of their normal technology, the Distort dice is not used. It is worth mentioning that this certainly isn’t a valid army list!
- Freeborn Command (Stass) with gun drone, shield drone and medi drone
- Vardanari squad
- Domari squad
- 7-strong Ghar Outcast squad
- Local Irregulars
- A wheeled cargo train
The Hunters: Again, these don’t exactly conform to an army list!
- Hükk with Angkriz, special munitions, spotter and camo-drone plus anything else to make up the points
- Algoryn Command
- Vector AI squad
- AI Infiltrators
- Four dummy markers number 1-4
Set Up
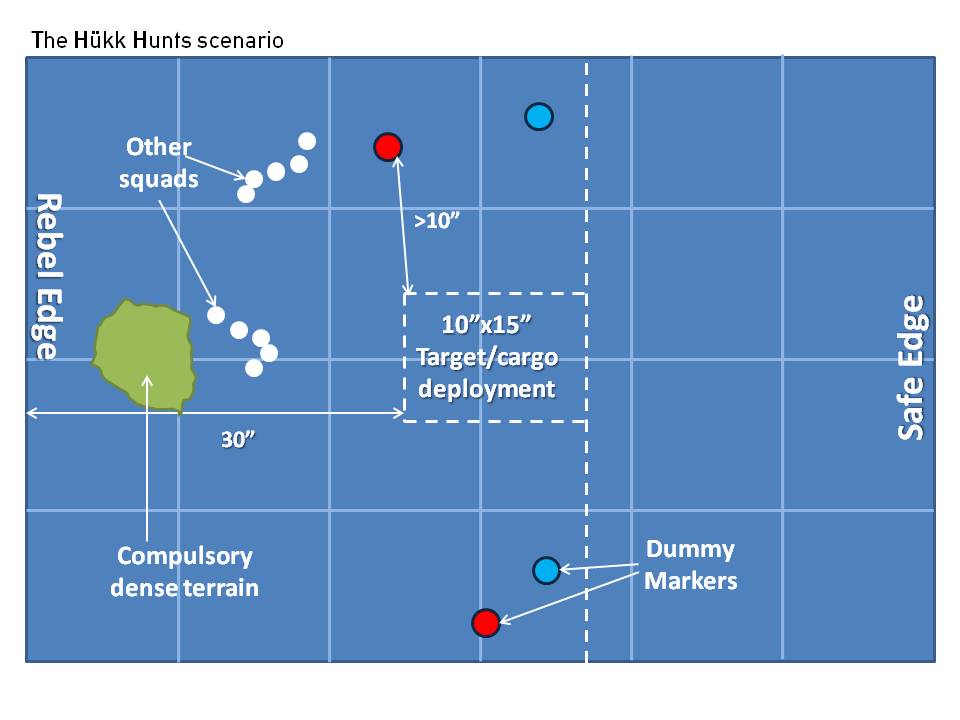
Decide which end of the table leads towards the Rebel’s camp – the Rebel table edge – and which leads back towards the trader’s ship – the Safe edge. Place a large piece of dense terrain centred along the table centreline approximately 5” from the Rebel edge. This should require an Ag tests to enter for all troop types.
Along the centreline of the table length and 30” from the Rebel edge, mark out a rectangle 10” wide x15 long” (see diagram). This is the Prey deployment zone, known below as the Box.
Set up the rest of the terrain as described in the Playing the Game rulebook with a mix of outdoor terrain: rough, broken ground, trees, woods, scrub, rocky terrain and similar. No area terrain should be closer than 5” to any other area terrain. Make sure the Box is fairly open terrain and there is space within it for the cargo and several units to deploy without being in rough terrain.
Deployment
The Hunters deploy more than 10” from the box, anywhere in the Rebel half of the table and anywhere forward of the back edge of the box. Any unit that has a camo drone uses two of the numbered markers instead (refer to Special Scenario Rules for secret deployment). Hunter units can deploy with ‘Ambush’ or ‘Down’ orders.
Once the Hunters are deployed, the Prey deploys the Target’s unit and the Cargo fully in the Box. The Prey can then deploy other units within this box (including Infiltrators or Snipers), but any other units no deployed at the start of the game, including Infiltrators or Snipers, can only come on from along their Safe edge on turn 1.
Game Duration
The game is played until six turns have elapsed. Then roll randomly to see if another turn is to be played (Antares rulebook, p.141). Break points are ignored for this game.
Objective
The Hunters have to capture the Target OR kill/incapacitate the Target and capture the Cargo. The Prey have to escape the live Target and the Cargo off the table via the Safe or the Rebel’s table edge.
Victory
The Hunters win outright (5-0) if they incapacitate and capture the Target (Captain Stass) by the end of Turn 6. If they take an incapacitated Target off any table edge before then, they also win outright.
Otherwise, consult the VP table, below.
| Who | Condition | VP (Max 5) |
|---|---|---|
| Hunters | Capturing the Cargo | 1 VP |
| Hunters | Preventing the Target meeting up with the Rebels | 1VP |
| Hunters | Taking an incapacitated Target off the table | +2VP |
| Hunters | Incapacitating/killing the Target | +2VP |
| Prey | The target is still alive but on the table | 1VP |
| Prey | Escaping a live Target off the Rebel edge | 3VP |
| Prey | Escaping a live Target off their Safe edge | +1VP |
| Prey | Escaping the Cargo off their Safe edge | +1VP |
| Prey | Escaping the Cargo off the Rebel edge | +2VP |
Special Scenario Rules
Unit and Deployment Options
Any infantry Hunter squad in an Algoryn army can be equipped with a camo buddy at +1pt. Hunter squads can also elect to be on Ambush or Down prior to the start of the game.
Hunters can use secret deployment by using two deployment tokens for each unit with a camo drone. These should be numbered: one is the real location of the unit, the other a dummy. The Hunters player should make a note of which numbered token represents which squad.
The tokens mark the potential centre point of the squad. A marker may remain as a marker providing it is more than 10” from enemy and:
- is stationary or
- represents a unit that is Down or in Ambush, or
- is moving within Light or Dense cover, or
- is out of enemy LoS.
As soon as any of these conditions are broken, the token is revealed, must be removed and, if not a dummy, must be replaced with the squad it represents. Once a squad is revealed, its dummy marker must be revealed, also!
An order dice given to a unit that is still undisclosed should be placed to one side, making sure both players know to which marker/unit it applies. When an Advance or Run order is given to a unit and its dummy marker, both markers follow the order until revealed.
Cargo Pod
The cargo pod is on a suspensor pad or cargo transporter and should be at least 4” long, perhaps up to 12″. Apart from being an objective, it can also act as a (mobile) obstacle or terrain: if low, a mobile wall offering +2 Res and -1 Acc if shot over; if tall, it acts as a solid piece of impassable (but mobile) terrain which can be shot at and damaged like a building and having 8 Damage Points.
The cargo pod is classed as an equipment model and is controlled if a non-probe, non-beast and non-sharded unit is within 1”. The cargo pod can be ‘towed’ or guided by any controlling infantry unit that starts its move within 1”, but the unit doing so cannot sprint. It otherwise moves at normal speed (M=5”) like any other model, and not as buddy drones!
Capturing the Target
The Hükk has the ‘Subdue’ ability. Other units can also capture the Target commander (Stass) by killing the Target in hand-to-hand combat and winning the combat. Of course, this may be problematic for if the units killing the Target lose the hand-to-hand combat they lose out two-fold as the Target remains dead!
Designer’s Notes
At first glance this scenario seems impossible for both the attackers and defenders – but be aware that you opponent is thinking the same as you! Whilst it is set up to be as balanced as possible, it is easy to upset the balance by having a very assault-based army or plenty of units with a fast movement. As can be seen from the fiction-based lists, it can be a great idea to put together forces that look as if you might have a fun game with, or which match the narrative, rather than conform to the army lists.
There are ways to alter the balance this by insisting that neither side can take any units with a standard base side of over 40mm. This cuts out skimmers and many mounts, but allows Ghar suits and light support weapons. Indeed, the scenario works well without any Large vehicles or mounts.
If the Prey are heavily Assault biased, such as a Boromite or Algoryn, then it is strongly suggested the Box is moved 6” so as to be 36” from the Rebel edge and start on the mid points of the table. This is to make the Prey’s job harder, and the technique can be used for other, tough forces as well.

You must be logged in to post a comment.