
Based on his experiences during the first Antares ‘Xilos’ Day in 2016, Lea Davidson sent in this adaptation of the multi-player, scenario 6 in The Battle for Xilos supplement for two players at around 75-100 points each. We’ve included it as an example of how to adapt the Narrative Campaign scenarios: thanks, Lea!
Scenario 6 in The Battle for Xilos is an ambitious game written for six players, recommending an umpire and assistants. It also requires a 12’ x 6’ table. Rick’s notes for the scenario make suggestion of a smaller version of the game which still requires multiple players and a larger than average table.
Here is further simplified version of the game for just two players and using the standard 6’ x 4’ table. Unfortunately, this dispenses with interesting mechanic where a unit’s order dice may move from one bag to another but it does at least allow a couple of players to simulate an escape from the Xilos caverns as at the conclusion of the Xilos story.
Set Up
Set up the terrain as described in the Playing the Game guide in Rules Central. The whole area is covered in rocky spires, areas of boulder or rocks, rubble, debris forming obstacles, and fissures in the tunnel surface.
Deployment
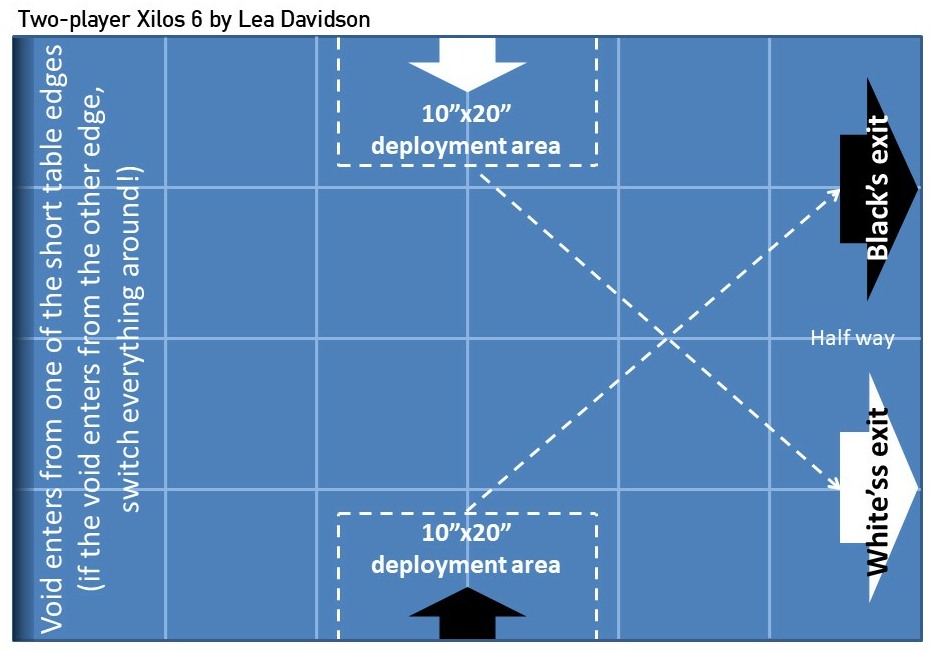
In this scenario both sides deploy half of their forces on the table at the start of the game. These units are deployed within the player’s set‐up zone as shown on the map above. The setup zone is 20” wide and 10” deep, centred upon the middle of the player’s long table edge (as there is no table half, units with different deployment such as Snipers can only be deployed in this area, too).
If either side has probes these must be included in the initial deployment.
Remaining units enter the battlefield from the first turn onwards along the 20” of table edge corresponding to the player’s set‐up zone. In this scenario, regardless of whether units enter in the first turn or subsequently a successful order test is required to move onto the table.
Objective
Both sides have the same objective – get as many units off the appropriate exit point as you can and stop the enemy doing the same. The exit point is the furthest half of a short table edge from the player’s deployment zone as per the diagram. As described below, a dimensional rift will start destroying the caverns, entering from one of the short table edges. Needless to say, the exit points are on the opposite edge to the rift…running into the rift is not recommended!
Game Duration
Play for the usual six turns and then test to play a further turn, as normal. It is unlikely, but possible, that the rift will make it to the opposite table edge at the end of turn 6. If this happens, there is no 7th turn and no need to roll for one.
The game also ends at the end of any turn if one or both sides succeed in moving all surviving units off the table, ignoring units of probes because these don’t score for leaving the table anyway.
No side will break in this game as the danger posed by the rift keeps everyone motivated!
Victory
Each unit that you get off the table via your assigned exit point earns 3 victory points. Each enemy unit destroyed earns 1 victory point up to a maximum value equal to your score for getting units off the table. The side with the most victory points at the end of the game is the winner. Equal scores is a draw regardless of the number of units lost on either side. Probes and other sharded units don’t score at all for leaving the table. Sharded units don’t score for casualties unless an entire sharded unit is destroyed.
Special Scenario Rules
Dimensional Rift
At the end of Turn 1, a rift enters the table from one of the short table edges. Roll to determine which edge the rift comes from. At the end of Turn 1 and at the end of subsequent turns, the rift will advance to the opposite edge by d6+6 inches. This can be indicated by placing a marker in the centre of the table at the leading edge of the rift.
Move the marker to indicate the advancing rift. The entire table behind the rift is destroyed including any models caught within it. If units are divided by the rift any models caught by it are destroyed and models not yet caught are unaffected. In most cases use the centre of the model’s base as the parameter, but in the case of large models they are caught if any part of their base or body is covered by the rift.
Ghar Attackers
If the approaching rift were not bad enough, the escape route through the tunnels is made more deadly by the presence of Ghar. Two opposing forces of rebels and loyalists are fighting among themselves just off the short table edge opposite the rift.
To represent the danger posed by the Ghar, add an order dice of a distinct colour into the bag from the start of Turn 2 and each subsequent turn. When this Ghar dice is drawn, it should be rolled. If a Fire or Advance order is rolled, any unit within 24” of the “Exit Points” table edge risks being targeted by a unit of three Ghar Battlesuits. These do not have to be represented on the table.
If several units are eligible to be attacked, roll randomly to determine which is. The opposing player to that which owns the targeted unit can then make a shooting attack (assuming an Acc of 5 and using three Scourer Cannons). If a Fire order was rolled, the attack benefits from the +1 bonus as usual.
Note that a distort dice is not used for the off-table Ghar in this scenario.
Leaving the Table
In this game units can only leave the table via their appropriate exit point. As is the usual rule a unit is judged to have left the table as soon as any portion of a model crosses the edge, and the entire unit is then removed.
Designer’s Notes
The playtesting for this game used two fairly conventional forces (Concord and Freeborn) and it worked quite well. We used the equivalent of 100 point armies and would expect 75 – 100 points to be about the right size (the game was played using the original army lists and points values in the first edition of Beyond the Gates of Antares, and the suggested values have been amended to be compatible with the current army lists and points values.)
Certain special forces might find this scenario too easy to win. For example, a Concord Rapid Reaction Force heavy with Interceptors could make it to their exit point very quickly. Players should use caution when selecting forces for this scenario!
On seeing this adaptation, Rick Priestley commented that it was a ‘Good idea.’ and ‘This looks like a good running fight with a bit of danger thrown in to keep the players moving.

You must be logged in to post a comment.