An asymmetric, narrative scenario for an attacking army of 125 vs a defender of 75 points with some orbital support.
Debris or cargo — you do not know — has crashed onto the jungles of Sachtiere, a planet whose star system lies on the Senatex-Determinate Interface, close to the border with the Concord. It is believed to be from, a Ghar ship, one the Ghar allowed to be infested by Virai. The problem is that the same ship had also been carrying intelligence cores from Concord starships, cores the Ghar wanted the Virai to infect.
The main factions already had ships orbiting the planet and all sent down a force to find and seize the debris to allow it to be retrieved. The problem was that each only had a small window of opportunity provided to them by the orbital patterns, so were limited in the amount and location of forces dropped to find and seize questionable items.
Defenders: You arrived first, but with a small force, the rest being left behind to crew some anti-orbit artillery pieces. The strategy is to fight off the ships of the other factions allowing your own ships to provide some orbital support in the form of an orbital barrage or by dropping asteroids on your opponents.
Attackers: You have greater numbers, but when you close on the debris you find your enemy has just pipped you to the post and has started to dig in. What’s more, your own ships in orbit are being driven away by some heavy, anti-orbit artillery the defenders have deployed. You must seize the debris so you can tag it and allow your ships’ industrial-sized transmats to pull them up. The trouble is, given you have no orbital defense, you do not know what the enemy ships above will do. The bad news is they have been gathering asteroids and will almost certainly throw them at the ground – nasty; the good news is that given the transit times, they will have to predict where you are and it isn’t always very accurate (depending on how the rocks break up!).
Running the Game
You will need two different, circular templates for this game: one 4″ in diameter and a second 8″ in diameter. Alternatively, use a 4″ template (available from template retailers) and measure 4″ from points on the circumference. These will be used to determine which units are hit by the meteors/bombardment.
The Forces
The defender has a 75 point list whilst the attacker has 125 points.
Set Up
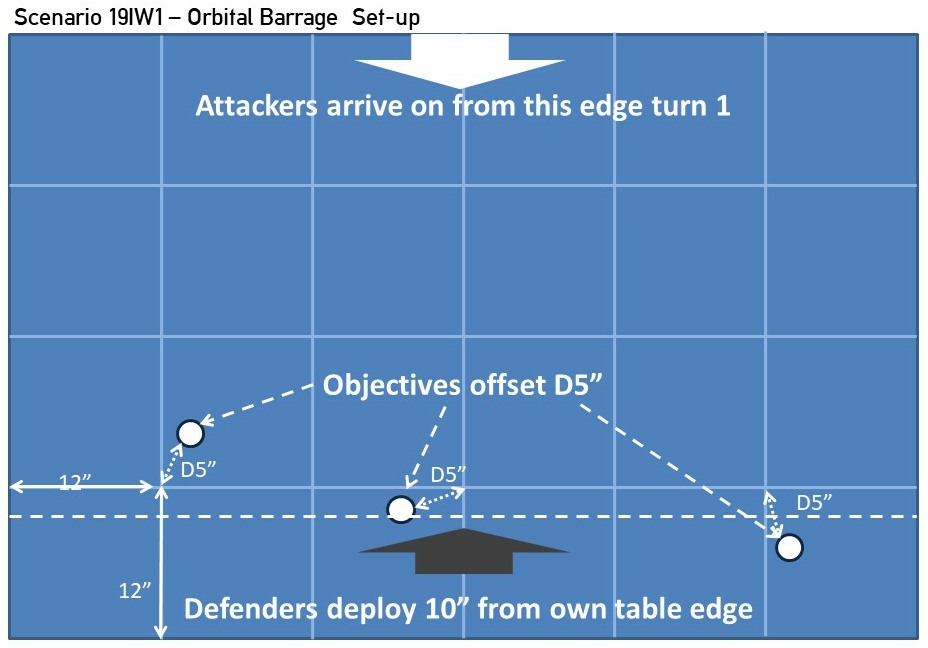
Set up terrain in the standard manner as described in Playing the Game. Then decide the defender’s long table edge. Having done so, place three debris/cargo objectives in the defender’s half of the table, 12″ in from the defender’s edge. The two flank objectives should be 12″ in from either side, whilst the central objective should be placed on the centreline.
Having placed them, move the objectives D5″ in a random direction (roll a D10, half the result, and place the item in the direction indicated by the point on the dice).
Deployment
The defender is deployed within 10″ of their base, long table edge – that nearest the objectives. They can be dug in with borer drones and any of the defender’s units can have Ambush orders prior to the start of the first turn. The attacker comes on from their own, long table edge in the first turn. See the diagram for an example set-up and deployment.
Before the start of turn 1, the defender states where the first orbital artillery strike will hit at the start of turn 2 (see Special Rules, below).

Objective
The objective is for either side to retain control of at least two of the cargo/debris markers. These can then be transmatted back to the orbiting ships and safely analysed for the Concord ship-core or for Virai infestation.
Game Duration
The game is played until six turns have elapsed. Any objective completely fully controlled at that point is considered to be tagged and is transmatted away. Then roll randomly to see if another turn is to be played in the usual manner as described in the Playing the Game guide in Rules Central, to see if any other objectives can be controlled.
Break points are ignored for this game other than for the defender’s bonus VP.
Victory
2 × Victory Points are given for each objective controlled (see below) by a faction, with an extra VP given if two objectives are controlled for a total of 5VP. The defenders gain an additional VP if they break the attackers (up to the maximum of 5VP). For the sake of tracking winning margins, it is worth tracking how many order dice the opponent started the game with and how many were destroyed (as a percentage).
Special Scenario Rules
‘Control’ of an objective is as defind in Playing the Game.
The rocks
The defender’s meteors and orbital barrage hits at the start of each turn from turn 2. The rocks strike after dice have been returned to the bag at the end of the previous and immediately before any retained ‘Run’ orders are actioned. The rocks damage units they strike.
The sequence of events is as follows:
- After deployment, and prior to the start of turn 1, the defender secretly makes a note of three grid references (slip provided, below). These designate the intended, target grid references for two × ‘lightweight’ meteor strikes and a single ‘heavy’ meteor at the start of the next turn. It must be clear which of the three target points is that of the heavy meteor.
- Starting from turn 2, prior to any retained Run orders being actioned, the defender declares the three target points written down at the start of the previous turn and the meteor that will strike at the point (heavy or light).
- Units within 4″ of the declared target points may attempt a Dash to Cover Reaction if they have the dice or capability to do so. They must do so and move AFTER the intended, target grid reference is announced but before the ACTUAL position is determined.
- After any Reactions, the actual strike point of the meteor is determined: roll 1D10 and move it in the direction indicated the number of inches shown (1″-10″). Centre a meteor template at the location: a 4″ template for light meteors and 8″ for heavy (See Grid References, below).
- Any unit with any model under, or partially under the template is struck by the meteor. Light (4″) meteors do D5 × SV3 hits distributed equally amongst all the units they strike; heavy (8″) meteors inflict d8 × SV5 hits divided equally amongst all the units they strike. It is important to note that the rocks do not differentiate friend from foe! No roll to hit is made and units hit by the meteors take pins from shooting as normal.
- As soon as all the strikes and damage has been calculated, the defender secretly notes the intended target grid refs for the bombardment at the start of the next turn (as in 1). At the start of that next turn, the sequence runs through again from (2) above.
Grid References
Whilst almost any grid referencing system can be used, during playtesting we found that using 12″ squares on a 6’x4′ table made it too easy for the attackers to evade the barrage! As a result we suggest using the grid system below which relies on each grid point being 6″ from any other. It is worth noting that table edges are valid target points, and we suggest using LS and RS or similar to confirm that _is_ what the defender meant, but that the barrage may well miss the table completely! This is also included on a simple orbital barrage form to fill in each turn (PDF format) – this can be printed out two-up at half size (2×A5 on A4).

Designer’s Notes
Whilst there is a huge disparity in forces, and the defender’s orbital strikes make up for a lot of the difference, the attackers still have to get a really good move on in order to seize the objectives. What’s more, the defenders cannot rely completely on the barrage! It’s a good idea for the defenders to set up in, or use, as much terrain as they can and the use of Ambush orders early can be useful.
A key consideration is that the defenders are likely to lose a lot of units, though given the low orbit of their own ships their troops are almost certainly transmatted back up to their troopship.

You must be logged in to post a comment.