
A solo scenario for 300+ points using the turret drones from ‘The Dronescourge Returns’ supplement.
Terraformers and nanosphere factories on interface systems are invariably guarded by heavy defences. For the advanced nations, these are typically automated, gun turrets or similar, but for the less technologically advanced nations these are crewed defensive positions.
So what does that mean to you, the commander of a small task force? Well, you have been asked to make a lightning strike on a nanofactory. The idea is to go in fast, get past the static defences and disable as much of the installation as possible before the defence force arrives in overwhelming numbers. Critical to success is that you have to get sufficient units off to cause enough damage to the structures.
Others have tried and failed: can you succeed and turn the tide?
Running the Game
In addition to your own forces, table, terrain, dice and order dice, you’ll need objects – models or turret-shaped objects – to represent the static defensive turrets or weapon teams. You’ll also need different coloured order dice for the turrets – one for each.
Whilst you can make your own turrets out of spare parts, or even print some if you have a 3D printer, we found it easiest just to use a support or heavy weapon model or a suitable weapon drone – or even Ghar! If all else fails, a marker about 40mm across does really well. You can also use weapon teams as the defenders, though making sure they’re behind fortifications helps a lot.
For point values up to around 75, the table should be 4’×4′; larger games can be played on 6′ wide tables, but it should still be 4′ across.
The Forces
We recommend force sizes of around 30 to 75 points, with turrets being scaled to match the force, as follows:
| Attacker’s Points | Turrets |
|---|---|
| 30 | 2 × Mag- or Plasma- Light Support turrets |
| 45 | 2 × MLS/PLS turrets plus a anti-vehicle turret such as plasma, mag or compression cannon |
| 60 | As 45 plus a Mag Heavy Support turret or additional PLS turret |
| 75 | As 60 plus a Heavy Weapon turret |
| Each +15 | As 75 plus an extra turret, alternating between light support and anti-vehicle |
The plasma variants are significantly tougher than their mag equivalents, so a staged difficulty might be to use mag weapons first then add one plasma turret, then another.
Force selection should roughly follow the lists but we suggest actual selection is taken on a ‘this seems reasonable for a strike force’ perspective. Using heavy artillery such as x-howitzers or mag mortars ruins the game, so we assume it’s being suppressed by off-table counter-battery fire. Forces with substantial numbers of skimmer bikes should also be classed as one level higher, at least, and with the cleared zone extended to 2′ (see below), otherwise they will skim past the defences before anything happens!
Set Up
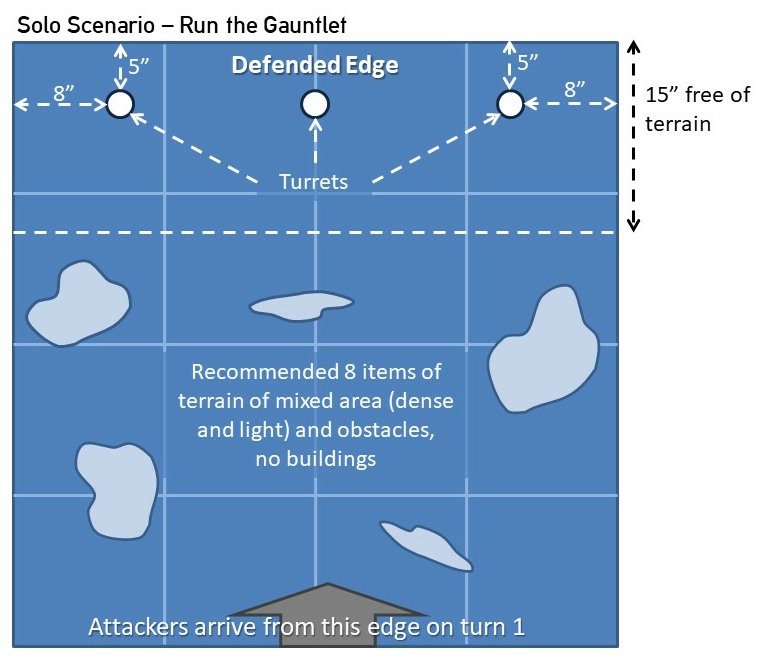
The defensive turrets should be placed with the side turrets 8″ in from each side edge and the rest spaced roughly equidistant across one end of the table. All should be 5″ in from that end. This is the defended edge. The heavier weapons should be in the centre with lighter weapons to either side. A 15″ area from the defended edge should be completely clear of terrain.
Otherwise, set up terrain as described in Playing the Game (see Rules Central): 12 items for 6’×4′, 8 items for 4’×4′ and 6 items for 3’×4′), maintaining the terrain numbers even though some of the table is to be left free – you’ll need it!
Hills or similar impenetrable or blocking terrain make for superb protection, so we recommend you put them in the first 10-15″ on the attacker’s side of the table, only. The defenders will have flattened serious impediments to LoS before they set up the defences!
Deployment
The attackers (the player) arrives on turn one and cannot deploy any unit on the table beforehand.
 Objective
The objective is to exit as many units as possible off the defended edge before defensive reinforcements arrive. If one member of the unit has their centre completely off the table, the whole unit is considered to have escaped/run past the turret drones and is safe!
Game Duration
The game is played until six turns have elapsed. Then roll randomly to see if another turn is to be played in the standard manner as described in Playing the Game. After this, the defender’s reinforcements arrive in numbers big enough to squash the attacking force.
If the attackers reach their Break Point, they must withdraw – the surprise attack has failed.
Victory
A victory is achieved if half or more of the attacker’s units cross the defender’s edge before the end of the game.
An alternate measure of victory can be determine as a percentage of order dice the attackers manage to escape off the defended edge, plus half that who otherwise survive. So a force with 10 order dice who have 4 escape and 3 others survive will score 55% [ (4+ 3/2)*100/10 ].
Special Rules
Turret Drones
Turret drones are best regarded as immobilised weapon drones that can rotate (see the Concord, Freeborn or Isorian Army Lists), so take pins and may have to take Order tests, as normal. The difference is that they will not break on an Break Test result and are forced Down, instead, representing excessive damage that temporarily disables the turret.
When pulling the turret drone dice from the bag, randomly select which turret activates.
- If any enemy (from the turret’s perspective) is in range and LoS, the turret must be given an Advance or Fire order and must shoot (i.e. no shooting at impossible targets). Target priorities are as shown below- if two units seem equal targets, read down to see which is the most important, otherwise roll randomly as the turret will just use a ‘randomise’ algorithm!
- A turret can only be given an Advance order if it has to reposition any batter shield or buddy drones/subsystems.
- If there is no unit within range and LoS, the turret can be given an Ambush order to fire at the first enemy unit that comes into range and LoS. At the end of a turn, any turret on an Ambush order retains the order unless in danger of having its batter shields outflanked.
- A Rally order can only be given to a turret if its primary weapon system is malfunctioning and it has Self Repair, or it has 3+ pins and there is no clearly visible enemy within Effective range.
- The turrets cannot be given Down or Run orders, though may be forced Down.
When destroyed, leave the turrets as ruins – some squads or individuals may be able to hide behind them!
Turret Drone Reactions
Turret drones will only attempt a Reaction in the following circumstances.
- If the turret has a net Init of 6 or more (Init – current pins).
- If the turret has an RF weapon, a turret will attempt a Stand and Shoot if assaulted, hoping the damage from the PBS will slow down the incoming unit!
- Firefight if shot at by an enemy within 20″.
An Ambush should already have been triggered beforehand, unless the turret is being assaulted, in which case it will switch its Ambush to a Stand and Shoot anyway!.
Target Priorities
- Units in clear LoS and not Down, with those closest to the defender’s edge receiving more priority.
- Units with fractal weaponry such as borers, fractal DBCs, and even Boromite or Virai mining tools.
- Other ranged weaponry or units that could destroy a nanofactory .
- Other units in Short or Long range.
- Anyone else.
Lucky Hit Priorities
The drones allocate lucky hits based on a straightforward protocol. Just step down until you find the relevant target:
- Strip batter- and medi-buddies first, then spotter buddies from a weapon team.
- Beast unit controllers (lavamite, Feral beasts, etc) (yes, a special entry!).
- Non-leader individual with most powerful weapon in infantry/beast squad, e.g. weapons with overload, plasma lances, disruptor cannon team, etc. Single-shot weapons target the main vehicle or a vulnerable squad member (i.e. go to 4!).
- Vulnerable members of squad (those without Tough, Wound or with lower Res), preferably those otherwise with special weapons.
- Squad leaders with powerful or nuisance weapons that lay down multiple pins (slingnet).
- Anyone else suitable.
Using Weapon Teams
Turret drones can be swapped out for weapon teams armed with similar equipment. The teams should have three crew and the buddy drones shown as spotters, below (so a Mag Cannon team should have two spotter buddies and a batter buddy). They will be entrenched behind an obstacle, whether improvised, rock or fortification, so gain the appropriate +1/+2/+3 ‘defended obstacle’ Res bonus. The higher the Res, the more difficult it will be to overcome them, of course!

Designer’s Notes
Randomising the turrets is effective, but if you’d like to punish yourself, allocate a drawn turret dice to that which has the best and most obvious target opportunity. This simple twist makes life really hard for the attacker, though!
A variant on this is to add another attack squad whenever one escapes off the defender’s edge – a never ending stream of attackers. This can make life slightly easier as the attackers force size keeps increasing and the raise their Break Point.
It’s worth noting that we just have not been able to playtest all combinations but thought it best to put the scenario out so players could have fun with it during isolation. If there are hiccups, do get in touch at the Warlord!
Turret stats
The sample stats provided here are for reference only. Twin mag repeater or twin plasma carbine turrets could replace the MLS or PLS turrets for an easier game. We recommend the heavier anti-vehicle weapons are only used if the attackers are bringing on the heavier combat drones!
| Turret Drones (Static Drones | Ag | Acc | Str | Res | Init | Co | Special |
|---|---|---|---|---|---|---|---|
| Mag Light Support Turret | – | 5 | – | 8 | 7 | 7 | Spotter Module |
| Plasma Light Support or Subverter Turret | – | 6 | – | 8 | 8 | 8 | Spotter Module, Batter Module |
| Mag Cannon Turret | – | 5 | – | 10(11) | 7 | 7 | 2×Spotter Module, HL Booster Module, Self-Repair |
| Plasma or Compression Cannon Turret | – | 6 | – | 11(12) | 8 | 8 | 2×Spotter Module, 2×Batter Module, HL Booster Module, Self-Repair |
| Heavy Weapon Turret | – | 5/6 | – | 13(14) | 7/8 | 7/8 | 2×Spotter Module, 2×Batter Module, HL Booster Module, Self-Repair |
Modules: All built-in modules act as buddy drones of the same type, can be the target of a lucky hit and are destroyed as if buddy drones.
Subverter Turret: This is a Concord turret with a subverter matrix built in. It is sometimes combined with twin plasma carbines or, occasionally, a PLS to make it a potentially deadly defensive weapon, best dealt with from a distance. The Subverter Matrix is classed as a weapon system.

You must be logged in to post a comment.