
Jamie Morris gives us the second of his series on building an Antares 2 gaming near home – with one player giving some excellent Algoryn painting advice. The previous article can be found here.
When we last checked in with our intrepid leaders, they were tasked with building an Antares army on a £50 per month budget. While at least one commander couldn’t resist a bargain, most of the team managed to stick to the budget and put together the humble beginnings of what we hope will be a mighty conquering horde in the near future. During month 1, the options were limited for most armies, but this month we see some of the flavour start to emerge as more points means more choice.
Andy Croft

Our second month happened to coincide with the King’s Coronation, and by another stroke of luck Warlord were having a 20% sale to celebrate – a perfect opportunity to get more for your money! My first choice was a simple one: another Hazard Squad, giving me a ‘legal’ Force Level 1 (FL1) Algoryn SD Force. While core infantry choices can sometimes feel a little boring, Hazard Squads are the exception, being one of the nicest looking and potent infantry units in the game.
However, as with my usual rule of cool ethos, I dedicated my next choice to the latest model to catch my eye: the Mag Mortar! I’d had my eye on the Mag Mortar right from the start, as it’s such a great looking model and with the sale it meant I could fit it in within my budget. I’ve not had much success with overhead fire so far in Antares but I just couldn’t resist the possibility of D10 Blast hits! It’ll probably either be awesome or have as much bang as a damp Christmas cracker! With a few quid left over I bought a Scout Probe shard to outfit my other units with Spotter Buddies as unfortunately neither the Hazard squads or Avenger skimmer came with any included.
My Algoryn Paint Scheme
Here is a quick guide to how I paint my Algoryn. In this example it is an SD Hazard Trooper but the same principles can be applied to pretty much any Algoryn model.
Base Colours:
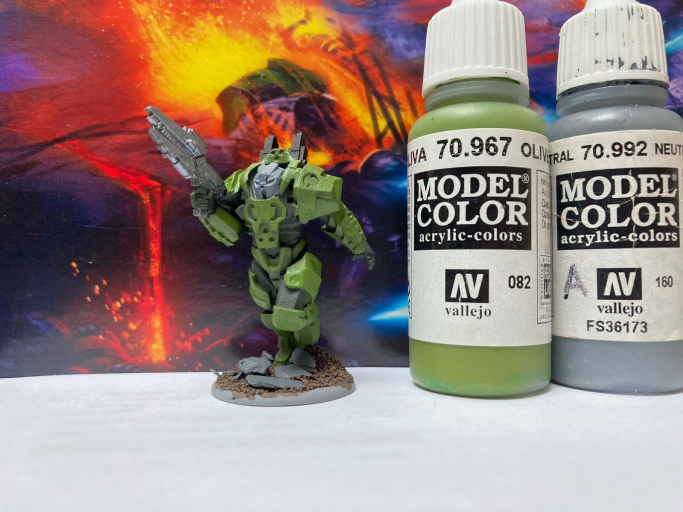
I like to make sure all the recesses are nice and dark so after a prime of Halfords Grey I applied a base coat of Vallejo Model Colour (VMC) German Camo Dark Green, with VMC Chocolate Brown on the base.

Next up I’ve applied VMC Olive Green to the raised armour panels, leaving around 50% of the armour dark green to provide some contrast. VMC Neutral Grey is applied to the helmet and VMC Black to the power unit on the back. The gun is also painted a metallic silver of choice.
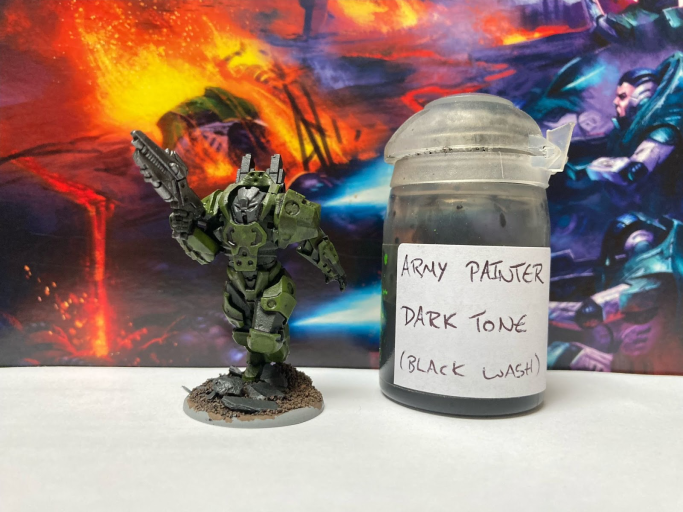
Wash:
I gave the model an all over wash with Army Painter (AP) Dark tone to give the recesses some real depth and tie the base colours together.
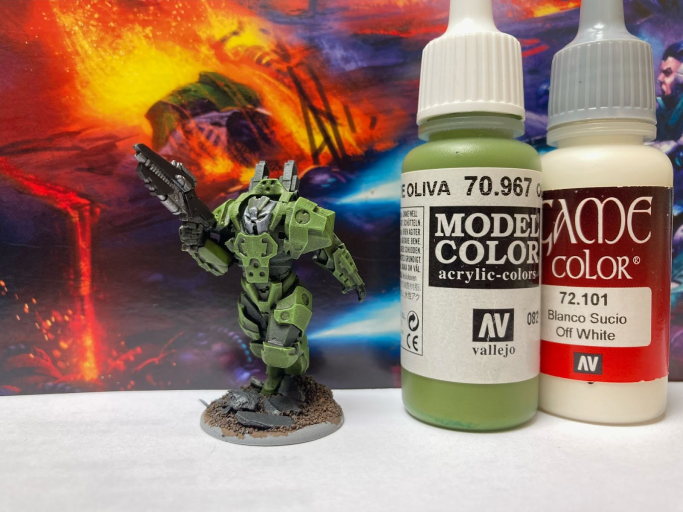
Drybrushing:
Now it’s time to get some contrast back onto the model and my absolute favourite way to do this is with drybrushing. It’s such a fantastic technique where the results far exceed the effort required. Also the Algoryn armour is perfect for it with all those layered armour plates, angles and sharp edges. The first drybrush is with Olive Green followed by a further lighter drybrush of Olive Green with a bit of added Vallejo Game Colour (VGC) Off White. The remaining dark armour was then tidied up with the original dark green colour.
Final Details:
The Helmet is a bit too small to drybrush so some layering of thin coats of VMC Neutral Grey, followed by VMC Light Grey and then a final highlight of VMC Light Grey + VGC Off White. The backpack was given a light edge drybrush with VMC Neutral Grey and the gun casings with VMC Black.
And that’s it done. It’s never going to win any awards but it’s a method I can maintain for a whole army and that’s the key bit for me. I always think a complete army painted to an average standard is far more impressive than a single excellent model but with the rest still languishing in bare metal or plastic!
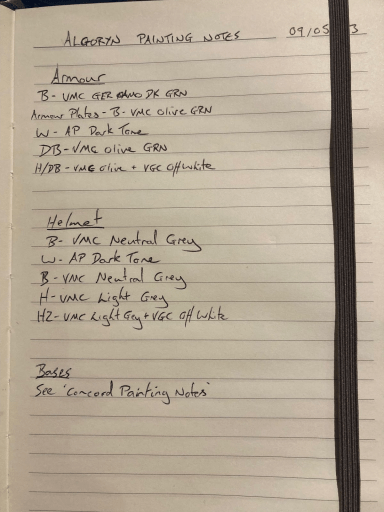
Andy’s Top Tip: Once you have your recipe refined and dialled in I thoroughly recommend writing it all down. I have an A5 notebook for writing down anything hobby related. It’s tempting to think you can just remember it but I’ve tried that and it never quite works. It’s so much easier when you can just look in your notebook to see which exact shade of brown you used X number of months ago when you last painted a model! It doesn’t have to be much, just enough to jog your memory!
And here is the rest of my force for the month. Now I just need to get them all together on the battlefield!

Josh Wood

Having now played nine games I believe that I’m starting to understand the Isorian play style. As fun as it is to run spider gorillas Tsan Ra squads into close combat, they have a very nasty habit of not surviving. Cue horrible flashback of a Tsan Ra torus squad dying to a unit of rebel outcasts and only taking two of the measly grubbers with them – not my finest decision. Currently I feel that the Isorians are best mid table and preferably in cover or better still behind a batter field (GLORY TO THE BATTER DRONE).
I have found that my go-to strategy so far is to hopefully have a few dice come out very early in turn one to sprint infantry into position. Yeah they will not get to shoot and will probably take one round of shooting immediately but they can go down in an attempt to make them more survivable. Then use the bikes to try and pick off a unit with their three lance shots and hopefully be at a dice advantage going into the next turn.
The Isorians are a forgiving army to play – not only can I activate a unit, carrying out my orders as planned, but when this inevitably turns sour I can go down with that unit and hope the incoming fire is countered by the phase armour. That mechanic is not to be underestimated and has saved me many times so far. The flip side is, of course, that any downed unit risks staying that way if the dice gods aren’t smiling on you at the end of the turn. But better alive and down than a steaming heap of what used to be your unit.
I’m a bit of a theory crafter, building army lists between games feeds by addiction to wargaming. Between the Beyond the Gates of Antares app, and full list of printed faction army lists from the Nexus, I had plenty to keep me going. One after another, I created multiple lists that I imagined would work well, and then tried to counter them with a different faction. I also attempted to make lists with the other factions that I believed to be reasonably strong and then try to counter them with a list of my Isorians.
When I say I really enjoy list building I currently have at least seven lists for each faction and many many more for the Isorians. I would say that I enjoy the list building almost as much as playing the actual game. Having built fifty plus lists I can say that I was very impressed with how balanced the points scale seems to be. Ignoring Ghar and their filthy amps, I worked out that on average you can bring approximately ten points of models per order dice. So at sixty points most lists would work out around six order dice. Sure you can get less than this and maybe a few more but not a massive dice advantage which was fantastic. Having played other games where you can take cheap units to gain cheap order dice, I know that this can be a very powerful tactic and I was impressed that it seemed generally an equal footing for most armies at least from an order dice perspective.
This month’s purchases started with two more Nar Vesh squads, giving me a lot more flexibility when building a list, allowing for two smaller units or one beefed up 5-tsan unit. The balance of points means the larger units are slightly cheaper per model but without the benefit of an extra order die. Next up I bought a unit of batter drones (GLORY TO THE BATTER DRONE) so I don’t have to proxy them in future games, and thanks to Warlord games putting on a twenty percent sale, I managed to squeeze an Andhak SC2 medium drone into the budget, giving me a mobile batter drone platform (GLORY TO THE BATTER DRONE) and some more heavy firepower with its plasma cannon.
Chris Hefferin – The Ghar Empire Expeditionary Force (GrEEF)

After my Ghar finished their first outing with a resounding victory against the Algoryn, I decided to reward them all with a crate of whatever it is Ghar drink when they celebrate (probably recycled outcasts). Unfortunately they spent the next month trying to retrace their steps to find where they’d parked the ship, meaning I haven’t been able to capitalise on the victory as much as I’d have liked. Still, I did learn a few things from tussling with the Hazard squads, and brought that knowledge to bear when choosing my new units this month.
Choices for month two are tough – there are so many units I’d like to add to my force, but I have to think about what I need most urgently. The obvious choice would be a couple more squads of Battle Suits, but as powerful as Ghar battle suits are, I also wanted a centrepiece around which to expand my army. The Command Crawler was my first choice, since I’d seen it in action during my first game and knew it to be a formidable opponent. It’s also a fantastic looking model with the same strengths as a Battle Suit, but even stronger – more armour, more weapons and MOD2 rather than relying on amps. Still, it lacks long range firepower and might be an easy target for heavy weaponry.
The Bombardment Crawler, which I was already eyeing up last month, is a perfect blend of the Command Crawler’s presence and the Bomber Squad’s long range firepower. At £39, this death dealing cannon on legs is my main purchase for the month, and means that between it and my Bomber Squad, the Attack Scutters and Scourer Squad should have sufficient covering fire as they lumber across the battlefield.

As luck would have it, my remaining £11 is exactly how much I need for a unit of Tectorist scouts. This seems like an obvious choice, since apparently everyone else swears by them. I certainly wouldn’t say no to a reroll for such a big gun as the heavy disruptor bomber.
I managed to squeeze in a unit of Outcasts too, thanks to a sale on all things Antares! Not sure where these little blighters will fit in yet, but I’m sure they’ll figure it out once the bullets start flying.
Battle Report: Ghar vs Isorian Senatex
To give my Ghar their first run out with the Bombardment Crawler, I found myself facing Josh and his growing horde of Isorians. Josh may have gone over budget during month 1, but money can’t buy victory.
We agreed on a simple fistfight – two armies clashing until only one remains. That should play well to the Ghar strengths and veer away from any of those objective shenanigans that distract you from smashing your enemy to bits.
At 75pts, my army technically shouldn’t include a Bombardment Crawler, since it’s only allowed at FL2 and above. But Josh was kind enough to allow it, since he’s been bringing a Plasma Cannon to a Plasma Carbine fight since his first game in the form of an illegal MV5. I managed an upgrade to my Bomber Squad to bring it up to three suits, then brought along my Attack Scutters, Tectorists and Scourer Squad – the latter with upgraded with a Force Commander and Plasma Claws to make them a little more dangerous up close. 8 points went on a vanilla Outcast squad, giving me an extra order die and a meat shield for my elite troops. All this came in at 7 order dice.
Josh, on the other hand, managed only 6 order dice thanks to his MV5, sporting two batter drones. With almost half of his points gone, he had to choose between the mobility of the Pulse Bikes or the firepower of his new purchases. Since his new models weren’t painted up yet, he stuck to the bikes, upgrading them all to carry plasma lances, as if that would help. Two full size units of Tsan formed his core choices – one Tsan Mahra and one Tsan Vesh – with a borrowed unit of Targeted Probes rounding out the selection. To maximise the effect of his MV5 he took a Marksman army option, which sounds like cheating to me!
Turn one was a pretty muted affair, with both sides manoeuvring into position. Both the Bomber Squad and the Bombardment Crawler made speculative long range shots, but while the latter managed one hit on the MV5, it added two pins but nothing else. It wasn’t until later in the game that I realised disruptor weapons can remove a buddy as if landing a lucky hit, so both batter buddies remained. The Pulse Bikes sped forward and managed to put a pin on the Attack Scutters, but otherwise it was a quiet start to the game.
Turn two is where things heated up. The Tsan Vesh managed to take out one of the Scourer suits with a lucky shot. Thankfully the resulting explosion did not result in further casualties, but the single pin left behind was enough to force the squad down on their turn, despite the Force Commander’s high res. The Bombardment Crawler managed a hit on the Pulse Bike squadron thanks to the proximity of the newly acquired Tectorists. I only managed four hits out of a possible 10, but it was enough to obliterate one bike and apply a pin. The pin disappeared in the following action as the bikes swerved toward the nearby Bomber Squad to unleash plasma lances. The sturdy Ghar armour proved too thick for such puny weapons, and in the following turn the scourer cannons responded in kind, killing another bike and causing the last to flee the field in terror. Take that degenerates!
My unit of Outcasts, lacking any better targets to shoot at, fired a hail of bullets at the nearest Targeted Probe, easily destroying it. They then rolled for limited ammo. “Click” – a 10 meant they were out of bullets after one enthusiastic round of shooting. It felt like exactly what Ghar Outcasts would do. [Ed: ROTFL at this one. So true!!!]
Unfortunately Josh’s MV5 was close enough to start taking pot shots with its plasma cannon, killing a second Attack Scutter and leaving the third with two pins. The Bomber Squad, buoyed by their amps, managed to take out one of the batter drones on the MV5, but the remaining 5 hits were easily saved. Still, another two pins is not to be sniffed at. Not that it helped, since Josh passed his next order test with a 1 and removed both of them. With another order, the Plasma Cannon then turned on the distant Bombardment Crawler, but missed, despite a spotter buddy. This is where his “Marksman” army option came into play, giving him another attempt. In a jammy stroke of luck, he blew up the Bombardment Crawler in a shower of superheated shrapnel. The Bomber Squad answered by destroying the second batter buddy, but it was of little consolation. The only saving grace was that the Scourer Squad managed to get up thanks to plasma amps, advancing toward the closest unit, the Tsan Mahra. The disruptor blasts added two pins, but didn’t inflict casualties.
Determined to avoid the charge of Josh’s spider gorillas, I managed to pull out a Ghar order die at the start of turn 3, and I ordered the two survivors of the Scourer Squad to take on the pinned Tsan Mahra, reasoning that I only had to survive and would likely win on pins. Charging into combat, they managed to kill one with focused fire without losing any in return, adding a third pin. Unfortunately, that’s where my luck ran out, as the remaining two Tsan opened up with four SV3 attacks, crushing a battle suit and routing the leader. The High Commander will be having words with the coward back on Gharon Prime.
Elsewhere the Bomber Squad continued to harass the MV5 but, realistically, I should have focused my attention elsewhere. While adding pins did make it less effective (as two missed shots can attest to), the disruptor bomber was not powerful enough to put the drone under any real threat. Meanwhile the Tsan Vesh were closing in on the last effective unit of Ghar – the Bomber Squad. The Outcasts threw themselves recklessly at the Tsan Vesh, but were cut down in point blank shooting, and thanks to Reg, who forgot to pack spare ammo clips, they didn’t even fire a shot in return. The survivors were routed, and with over half of my order dice lost, next turn would be my last.
I started proceedings in turn 4, and while the Bomber Squad managed to deal enough pins to the nearby Tsan Vesh to keep them from inflicting any casualties, the MV5 scored a lucky shot on the Bomber squad, and naturally put it on the Bomber. With res 12, the save against a SV7 plasma cannon becomes a 50/50 roll. I’d like to tell you that I passed that save, but that would be a lie. With the clock running late, we agreed to call it there, but I’m sure my last two Scourer Suits would have won the day given more time.
It was a fun game either way. I think next time I’d like to bolster my force with Flitters, for additional long ranged accuracy, and a squad of Outcasts to draw the fire of my enemy. We also completely forgot about the Ghar distort die until the final turn, but I’m sure it would have been equally disastrous for the Ghar as for their enemy.
Josh Peel
Onto our second month of purchases, and I thought I had it all worked out. But then Warlord had another sale so I went a bit rogue and came up with a whole new idea for the skeletor-inspired warriors. My new theory is that they will be a mechanised force based off of our modern day dragoons who ride into battle and dismount to engage the enemy. So with this in mind I picked up two drones, the C3M4 combat drone and a C3T7 transport drone. The theory behind this was the transport drone could load up on Strike Troops while the gun drone can provide the fire support required!
The game
For my second game in the series I was off to face Andy Croft! Normally I wouldn’t worry about the Algoryn Prosperate, given their inferior technology, but Andy likes his Special Division, who pack some surprises up their sleeves in the form of Hazard armour. With that in mind, I made a list that I felt would counter his strengths with mobility and high strike value weaponry. I started out with two Strike Squads, the best trained soldiers in Antarean space. I’d like to say there was a good reason to take them, but they are a required choice in a Strike Force, and will be a meat shield at worst, or a menace at best.
To outmanoeuvre the Hazard Troopers, I brought along an Interceptor Squad, while two plasma light support drones should lay down enough fire to cover them in pins. A Support Team armed with plasma cannon would serve to crack open the Avenger I know Andy will bring with him while my new C3M4, armed with another plasma cannon, would offer a backup option, as well as roaming firepower against any other nasty surprises Andy might have in store.
When I arrived, I saw that the nasty surprise in question was a Mag Mortar. While my forces would benefit from an extra +1 res against blast weapons, D10 hits would still be enough to make even the best trained Strike Troopers wet themselves in fear. Three Hazard Squads and the Avenger Attack Skimmer formed the predictable core of the force, while a Targeter Probe shard would make his overhead fire especially deadly. This was bound to be a bruising encounter.
The mission we chose was ‘Scenario 2: Reinforce the Position’. We both had to leave half our order dice off the table, which could be bought in from turn 1 if needed. I left my C3M4, Interceptors and a PLS drone in reserve, reasoning that they could catch up better than the infantry. Andy left his skimmer and Targeter Probes off the table, I assume for the same reason.
Turn one started quite well for me: I managed to bring on my interceptors and punch them a good way up the table. My combined plasma cannon and PLS support drones whittled down one of Andy’s Hazard Squads and put some pins in place! Andy was unable to muster much of a response beyond a couple of pins.
Turn 2 got off to a rocky start for the Concord as Andy’s Hazard Squad emerged from cover and gave my Interceptor squad a glow up… by which I mean they got turned into molten goo by plasma fire! Not the best of starts for me, and a blow to my mobility for the game! Andy also managed to knock out the batter field on both of my PLS drones, robbing my infantry of their most effective cover! Less than ideal!! But as if to answer my disparaging comments on core choices earlier, one of my Strike Squads then managed to inflict further casualties on the same Hazard Squad who took out the Interceptors, putting valuable pins on them in the process! Towards the end of turn two the Avenger skimmer advanced up the table to engage my PLS drone, immobilising it in place with a lucky damage roll! If only there was some mechanic whereby I could get my drone to repair itself! It took me until turn 6 to realise I could self repair this drone so had 3 turns of it being effectively hors de combat. With this rather large armoured threat coming down the flank I had no choice but to respond with my C3M4. It failed its first attempt to come on, so thank the Nexus for MOD2. It advanced onto the field, and from the flanks it put 4 pins on the C3M4 and immobilised it!
Turn three was again a mixed bag. I managed to finish off the Avenger Attack Skimmer with a plasma cannon shot, which was a huge win straight off the bat. However things quickly soured for the Concord when the Mag Mortar finished calibrating their aim. Having been relatively quiet for the first two turns, the weapon scored a direct hit on my Strike Squad, killing all hands in spite of the Hyperlight armour! Not good! Thankfully I managed to also kill off a Hazard Squad with some accurate plasma cannon and PLS fire!
Going into turn 4, it was all still to play for. I started to advance units up the field towards Andy’s Mag Mortar, and he came out to meet me with another Hazard Squad, who failed an order test to run, leaving my Plasma Cannon team unharmed for now. The same couldn’t be said of my functioning C3D1 drone, who roamed a bit too close to the last Hazard Squad, resulting in its destruction in a one-sided hand to hand combat!
Turn 5 saw my remaining Strike Squad take another direct hit from the Mag Mortar, resulting in 3 casualties. Luckily they passed their morale check, insured against death by the Concord’s advanced cloning technology. With both Hazard Squads back on their feet, the first attempted to charge the survivors of the Strike Squad, but failed their order test and went down instead! On the opposite flank, the other Hazard Squad managed to pass their order test and run around to where they would have been the previous turn. This put them within charging distance of my support team. I couldn’t have that, so the Plasma Cannon turned around and pink misted one of the Hazard Suits, forcing a morale test which the squad passed! The C3M4 manoeuvred into a firing position to try and finish them off, but failed to hit anything. At the end of turn 5 both armies remained unbroken but could only lose one more order die before fleeing the field.
House Rule
On p15 of “Playing the Game” it states that once an army loses more than half of its order dice, it is broken. We decided to add a little extra spice to the game by instead having the highest command unit take a break test rather than assuming an automatic break. This suits the scenario well if both forces are in a “do or die” situation and failure is not an option.
Turn 6 gave the Algoryn a running start. Andy’s Hazard Squad passed their moral test on a 1! This removed both pins and left them free to charge my remaining Strike Squad, at this point only two troopers. As you can imagine, this did not end well for the physically inferior Concord soldiers, whose Hyperlight armour doesn’t serve them well at close range. They were promptly stomped into the earth by the D-Spinner powered Hazard troopers, leaving me with a break test looming at the end of the turn! The next two order dice came my way, and in an act of desperation, I ordered both the C3M4 and the Plasma Cannon team to destroy Andy’s other Hazard Squad. “Righto,” said they, and killed the remaining armoured troopers with ease! With less than half of his order dice remaining, Andy would also face a break test at the end of the turn.
With the Mag Mortar successfully defended by the Hazard Squads, not much else happened in turn 6, and we left it down to two crucial roles – the break tests! With superior training, the Concord held their nerve, but unfortunately for Andy, he rolled a 9, meaning the Algoryn broke and ran!
This was a very close game and ultimately came down to a single dice roll! I’d like to think that the C3M4 could have finished off the Mag Mortar within another turn (or two), but equally Andy’s Hazard Squads were proving brutally effective up close, and I wouldn’t have bet the farm on the C3M4 surviving an encounter with them.

You must be logged in to post a comment.