
Dom Hine wanted to add some interceptors to his Freeborn force rather than the standard Skyraider skimmers. But he also wanted to keep the current Oszoni feel. He managed to do so, then sent in this excellently detailed conversion article. We’ll let him go through the details…
Dom: Now everyone knows the Freeborn are natural “borrowers” … they may not own something straight away, but just give them ten minutes and they can produce the paperwork to prove it is theirs.
With that in mind I have coveted the C3 Interceptors – for me they are the nicest fast models in the game to date. I could have taken the easy approach and started a small C3 force but the pull of the Domari was too great. However I was not a fan of the Freeborn Sky Raiders so I decided to apply a bit of Freeborn “borrowing”. The guide is below plus a few thoughts on things I’d do differently the second time round.

What do you need
- Box of C3 Interceptors
- Box of Freeborn Sky Raiders
- Sharp knife
- Clippers
- Hand drill
- Superglue
- Greenstuff
- Modelling tool
- Small pot for water
- Blutac
To prep the figures – wash the resin components in mild soapy water and let them dry. Cut the metal parts form the sprues and clean the flash lines off them.
Stage one – bike bodies and bases
Drill out the peg hole for the flying stand so it is deeper if needed (there will be more metal being held up than before), glue the engine to the bike body and the stands to the base with the pegs slightly back to balance the extra weight (before you do this check stage 5!)


Stage Two – Cutting the Riders
Starting with one of the standing Freeborn figures (not the set of legs!), compare the Freeborn rider to the C3 rider’s legs. This will give you an indication where to cut the body at the waist – you can either use a fine tooth saw or the clippers. If you use the clippers then cut the legs off first then work around the waist to finish it (the sadists amongst you may prefer the second option together with fake screams!). Then use the knife to clean up the cut so you have a level surface.
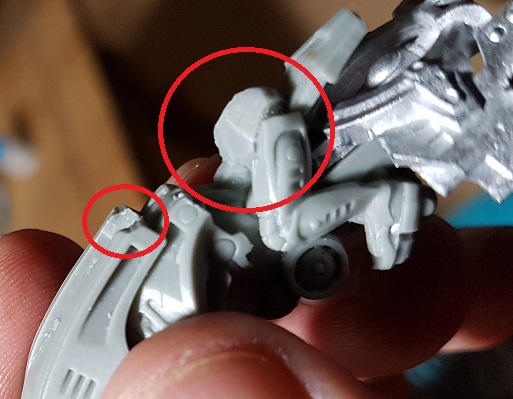
You then need to trim the waist of the C3 rider’s legs at an angle so that the torso leans forwards (fig 3). This is where the blutac comes in to give you chance to work out the angles. Don’t worry about gaps as they will be covered later. Don’t glue anything yet.

I did consider cutting the C3 rider legs off the bikes but came to the conclusion it would weaken the structure of the bike too much, it would take a lot of work to remove them and reposition the Freeborn rider’s legs and this would not give any greater benefit overall (I am taking it that the Freeborn also “borrowed” the C3’s trousers). So the interceptor needs to be cut ready to fit the torsoe, weapons and arms (fig 4).
Stage Three – Weapons
The weapon options the Interceptors come with are not compatible to the Freeborn options – you can use the “counts as” but I wanted to go with a more Freeborn look – to prove they own the bikes they attached their own guns to them! The Freeborn weapons fit quite well however the edge of the back of the front nacelle needs to be cut off at an angle (fig 4) and a groove needs to be cut in the centre of this as well (fig 5).

Stage Four – Dry Fitting
The blutac comes into use now so you can work out the positioning of the weapon and rider’s body. You will need to cut off the hands of the riders’ so they fit – this does not have an overall impact as it looks like they are reaching into the weapon guard.

Once you have the positioning right then glue the gun in place first – you may need to use a small match inserted under the gun at the front to keep it straight compared to the bike body whilst the glue dries (fig 7).

If you need to alter the angle of the rider’s arm then make a cut at the elbow using the clippers. This will bend the arm downwards. When you glue the rider’s body to the legs then very carefully bend the arm upwards to the correct angle and then put a few drops of superglue into the cut to strengthen it (fig 8).


Stage 5 – Final Gluing and Test Fit on Bases
Glue the torsos to the legs and test fit to the flying bases but do not glue (so you can undercoat easily). This is where I found a problem – where I had glued the stands was too far back! If you find the bikes are too far back or overhanging the edge then use the clippers to carefully clip round the edge of the base to lift it off, clean the glue off and reposition it (see fig 9)

Stage 6 – Greenstuff
If you haven’t used green stuff before it is a form of modelling putty that comes in a yellow and blue strip. You cut off as much as you need then knead it together till it turns green. The lighter the colour green the longer it will take to harden. If you can warm it slightly it will be easier to work with and keep a small pot of water close by so you can keep your fingers or tolls wet – that stops the Greenstuff sticking to them.
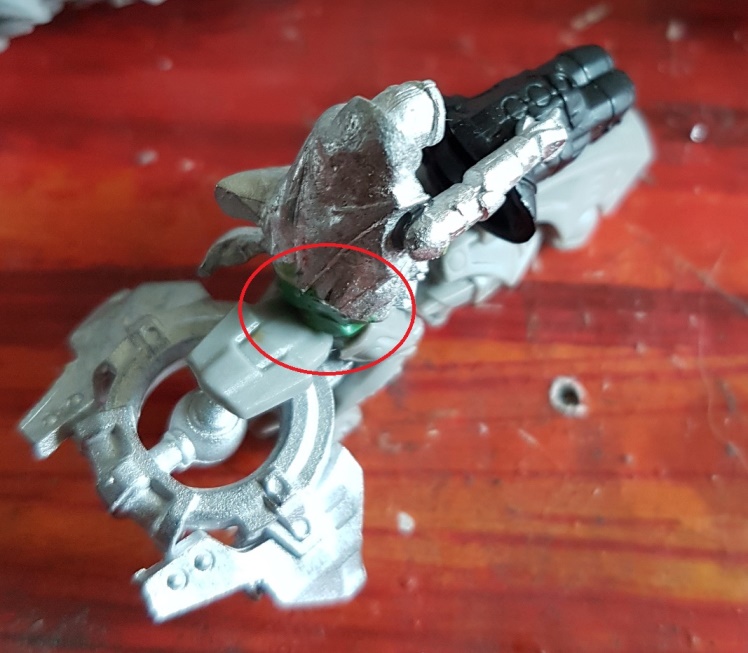
First step is to put a block of Greenstuff into the gap at the back of the torso/waist (fig 10). Let this set slightly – again it doesn’t have to be neat as it will be covered but it serves as a block for the cloak to sit on.
The cloaks then need to be rebuilt. Start off by flattening a square and then using a sharp knife dipped in water trim the edges so they are square. I then found it easier to cut a slight V in the middle. Don’t worry about fingerprints as you can polish them away later (fig 11)

Next attach the cloak extension to the base of the torso and using the modelling tool (dipped in water) smooth the join off and stretch the cloak out – this will also remove fingerprints (fig 12). As it starts to harden you can shape the edges of the cloak to fit the bike or to look like it is flapping in the wind (fig 12). You may need to cut smaller strips as some of the rider’s cloaks have smaller strips on the sides.

Using the curved end of the modelling tool keep working the cloak and polishing the surface of it and the join till it is smooth (see fig 13). Keep the tool wet so it doesn’t stick and drag the shape out. Be careful when handling the model so you don’t touch the greenstuff and add more fingerprints as well!

That’s the build done, let the greenstuff cure then undercoat, then paint!


You must be logged in to post a comment.