
On the moon of Bodora Vestea, the recent arrival of Boromite pirates has thrown an already volatile combination of forces into even more chaos. En route to rejoin with a larger Algoryn strike force, the Vector formation under the command of Commander Tor’el Kimolo have run across a large contingent of the pirate strength, fresh from a recent raid on a Concord excavation team. The Boromites, hoping to escape with the artefacts they liberated from C3 hands, are not keen for a firefight, but the Algoryn are determined to exact a toll on the pirates before joining up with the main force.
My friend Rich and I got together for a long overdue game of Antares, hastily throwing together two 100pt lists for an afternoon skirmish that we didn’t anticipate finishing in the 3 hours we had available. We picked Scenario 3: An Unexpected Encounter in the hopes that it would be relatively short. For those not familiar with it, the idea is to get your force off the opposite table edge while preventing your opponent from doing the same.
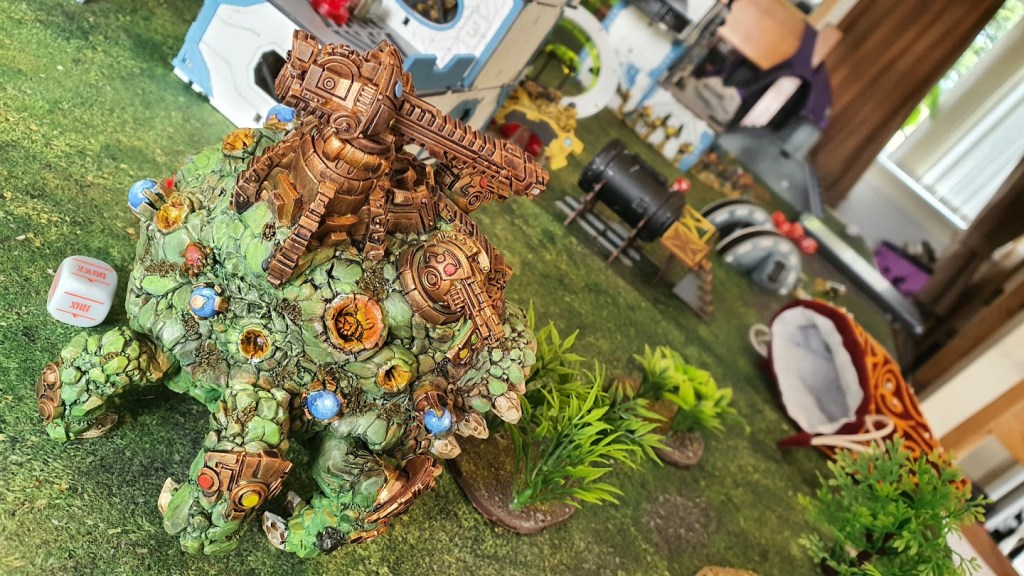
The Boromites, under the command of Rich, were relatively light on upgrades, but packed a terrifying punch in the form of the Matronite Brood Mother. My Algoryn, in comparison, managed to eke out 10 order dice, two more than Rich, but with my heaviest hitters being two Avenger attack skimmers, I was relying on mobility to win the day rather than outright firepower.
Turn 1

Most of this turn involved sprinting into position for both sides. We couldn’t remember if the Brood Mother was eligible to sprint, but in the interests of not getting bogged down with rulebook referencing, we agreed that it seemed fair to allow it. The opening salvo on both sides saw a total of three casualties – some Vector AI troopers falling to the Brood Mother’s impressive firepower, and a lucky shot from the Avenger taking out a single Lavamite at long range. The other Avenger tried in vain to crack the tough hide of the Brood Mother, but I realised that a regular Mag Cannon was not much good against the Res 15 behemoth.
Turn 2

I was lucky enough to get the first couple of order dice, and moved the Avenger away from the Brood Mother post-haste. The Brood Mother split its fire between several squads of infantry, taking out two of my Reaver Assault squad but failing to kill my medics, who had taken cover inside the building. The Rock Riders used their impressive speed to charge the remains of my AI squad and wipe it out, suffering one casualty in return, but now stacked with pins. The other Avenger continued its run of luck by taking out two of the Security Gangers closest to the building. On my left flank the Brood Mother was trailed by two squads of sprinting Boromite infantry. Rich was remaining focused on the objective. My Algoryn benefit from a higher movement speed, so I could afford to take a few shots on the way. They all looked set to miss until Commander Tor’el Kimolo himself managed to score a lucky hit on the Brood Mother, disabling its Heavy Mag Cannon, forcing it down with 4 pins and removing one of its order dice! A huge blow for the Algoryn!

Turn 3

Down but not out, the Brood Mother recovered its remaining order die and managed to take out the Batter Drone on the nearest skimmer, but couldn’t land a killing blow. In return the skimmer combined its firepower with the bunkered Medic team and managed to break the nearby Security Gangers. The Optimate Command squad continued its lucky streak, killing one more Rock Rider and forcing the last to flee in terror. The Reaver Assault troopers were going to charge the Brood Mother, but thanks to pre-measuring (which is now explicitly allowed in v2), I realised they were just out of range and had to take shelter in the building, hoping to make the charge next turn. Two more Lavamites fell to the second Avenger, converting me to the virtues of a Mag Heavy Support over a Mag Cannon. The Lavamites were not close enough to charge, leaving them little choice but to edge closer to the building.

Turn 4

I secured the first Order Die and tried to outmanouver the Lavamites with my Mag Cannon Avenger, hoping to at least add one more pin, if not remove one more opponent. I missed, however, and was charged in return. Thanks to some horrendous dice rolling on Rich’s part, the Avenger lived to fight another day, leaving the combined fire of the Medic team and the Optimate Command squad to finish the Lavamites off. The Brood Mother continued to pour mag rounds into the building, but managed only to inflict a single pin on the Reaver squad, who went down after failing the order test to charge the monster (“You want us to do WHAT?”). The second skimmer managed to destroy the Boromite X-Launcher team hiding behind the Rail Gun emplacement, while I secured the first 3 victory points for the Algoryn with the escaping AI squad.
Turn 5

The Brood Mother lost a whole turn to a failed order test despite having shed most of the pins from the earlier damage. The Algoryn X-Launcher team finally hit a target, putting 4 pins on the Security Gangers using Suspensor Net ammo with an incredible shot using Blind Fire. The only other events of note were the mass of escaping units, securing 6 more VP for the Algoryn and 3 VP for the Boromites.
Turn 6

As Commander Kimolo escaped the field, securing the Algoryn’s 4th and final VP, the Reaver Assault squad recovered their bravery, if not their senses, charging toward the injured Brood Mother and being gunned down before they could even bring their D-Spinners to bear. The Medic team fired at the Security Gangers, adding one more pin to the pile. For their part, the Boromites attempted to return fire but with the amount of pins they had stacked, they passed the order test and failed every shot.
Conclusion
Algoryn: 12 VP for escaping units, plus 4 more for casualties = 16 VP
Boromite: 3 VP for escaping units, plus 2 more for casualties = 5 VP
This scenario really doesn’t favour the Boromites. Despite being heavily focused on the objective, Rich had a hard time getting units across the field, because every turn of sprinting he was still moving 3 inches less. More than that though, the Boromites were crippled by bad luck (or by the surplus of good luck I enjoyed with the Algoryn). With so many points tied up in the Brood Mother, Rich had 2 less order dice and after the lucky shot in turn 2, the Brood Mother’s accuracy was hampered by pins and it became little more than a shield for the Boromite infantry.
That said, we both had a great time and managed to get through the entire scenario in 2 and a half hours, even though this was only Rich’s second game. I’d be hard pressed to pick my MVP – in spite of the critical shot fired by Commander Kimolo, I’d have to say that Avenger Attack Skimmer number 2 takes the title for the sheer number of kills from turn to turn.
